Wednesday, May 20, 2009
Shiitake Mushrooms
Last year a buddy and I plugged oak logs with shiitake mushroom spawn. They were so delicious that I decided to do it again myself this year. The process is simple. You take branches or small trees that were felled in winter (Jan/Feb is ideal) and cut them into 3-4' lengths. The logs should be no more than 6-7" in diameter ideally. The following April you drill holes in the logs that are the same depth as the dowel plugs are long. You gently tap the plugs into the holes and seal them over with cheese wax to prevent the spawn-laden dowel from drying out. Then you wait. The logs are 'racked' for a year to allow time for the mycelium to colonize the sapwood to the point that it's ready to bear fruit. The spring rains stimulate the logs to produce mushrooms. You can 'fool' the logs into fruiting by soaking them in cold water. I use a stock tank and soak about 4 logs at a time.
Labels:
mushroom logs,
mushrooms,
shiitake,
spawn
Queen Cells
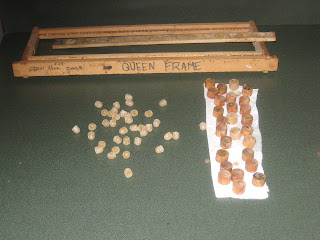
I finally went back to my 'old' way of doing things and made my own wax cups, primed them with royal jelly, and grafted the larvae into them. Out of 26 cells I had 20 that were accepted by the bees. The advantage I think to making your own cells are several-fold: Cost...they're free. Freshness...they are brand new and so don't have a chance to build up any wax bloom on them that I think deters the bees from accepting them. "Crispness" By that I mean that the edges of the cells, when properly made, are sharper than those available commercially. Having the thinnest, most pliable edges on the cells I think increases the rate of acceptance. The bees seem to prefer them.
After grafting I wait 24 hours to check to see how many are accepted. If the bees have begun to draw out the cell you can generally assume it has been accepted. You mark the graft date down on the calendar and make a note 10 days later to remove the cells to the mating nucs. I generally place two cells into each nuc (in case one is a dud) and let the queens emerge and take their mating flights.
Friday, May 1, 2009
Raising Queens Part III
Should have known better than to try dry grafting. The success rate on the initial graft was 0%. Dry grafting means placing larva into queen cells that haven't been 'primed' with royal jelly. I think the larvae dried out and were rejected by the bees.
I tried again tonight. I harvested some royal jelly from damaged queen cells and primed each cup with a small dab. Priming serves several purposes. First and foremost it makes it infinitely easier to float the larva you are grafting off of the grafting tool into the wax cup. It also serves to keep the larva from drying out. Some say it serves as a food source but I've also read that the bees clean out the royal jelly under the larva and replace it with fresh stock. The stuff I used tonight was as fresh as it gets so we'll see.
Grafting is difficult only because it requires a steady hand and keen eyesight. I'm lucky to be able to see the day-old larva in the cells and to be able to move them. I need to invest in a magnifiying headlamp. Holding a flashlight in your mouth while you work is nonsense.
Labels:
bees,
grafting,
queen cup,
royal jelly
Raising Queens Part II
Now that the Cloake board is set up and the bees are 'queenless' we can set them up to raise some queens for us. We use a standard medium frame that has been modified to accept cell bars. The cell bars are nothing more than paint stir sticks. Attached to the cell bars will be the wooden cell cups and pure wax cells into which the grafted larva are placed. I couldn't get any photos of the grafting process since it's too hard to hold a camera and graft at the same time. I need an assistant next time.
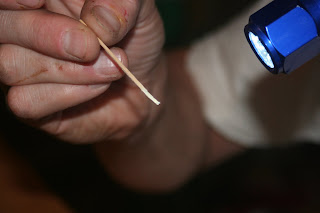
Today it has been over 24 hours since the introduction of the grafted cells. We'll check them to see how many were accepted. I'm not the most experienced grafter so I usually experience somewhere in the vicinity of 50% acceptance. Amazingly I also couldn't find my typical grafting tool when I needed it most so made use of a 'grafting' tool shown to me by Dr. Rick Fell of Virginia Tech. It consists of a sanded down wooden stick. Being almost paper thin it bends nicely to get underneath the larva.
Sunday, April 26, 2009
Let's Raise Some Queens
This afternoon I put my Cloake Board (CB) onto a good, strong colony of bees. The CB allows you to transform a colony of bees that are queenright (with a queen) into a colony that's queenless simply by sliding in a metal tray.
Once you determine that you have a suitable colony for raising queens you take off a box containing some capped/uncapped brood and shake all the bees off back into the colony. You place the CB onto the colony and put the box with the now empty frames back onto the colony. Then you rotate the colony 180 degrees so that the bottom entrance now faces what used to be the rear of the colony. The entrance to the CB faces in the same direction as the original colony's entrance. A CB has a queen excluder-sized grill for its floor. The nurse bees that were shaken off of the frames of brood are irresistably drawn back to the frames of brood that are now above the CB. What you are trying to do is to get a large amount of nurse bees above the CB that will draw out queen cells when the metal tray is slid into place. The bees above the CB think they are queenless and readily draw queen cells. Once the process of drawing cells has started you return them to a queenright state to finish the cells.
It helps to have a feeder on the colony to provide a source of carbohydrates for the bees that need to draw wax for the cells. Reversing the entrance makes the field bees reorient to the 'new' top entrance above the CB. The bees put their abdomen into the air, bending the last segment of their body to expose the Nasanov gland, and begin fanning their wings. In 24 hours we'll put the slide in to separate the bees above the CB from those below and to make them think they're queenless. In a day or so we'll graft larvae into queen cups and put them into the box above the CB. If we do everything properly we should find the bees drawing queen cells within 24 hours of our graft. Stay tuned.
Mike
Sunday, March 22, 2009
Garden, Bees, etc
I got the boys out in the garden this afternoon to show them how to use a garden rake and to plant carrots, onions, and peas. My oldest son Wade planted several rows of carrots while my youngest Jake planted peas and onion sets in his area. My hope is to foster a love of gardening in them. I turned over the dirt for them but had them use the garden rake to break up the clumps and rake things smooth. Each worm was a real 'find' for them. I encouraged them to cover the worms back up so they don't dry out. Each of them made a sign for their area of the garden with their names on it. After planting I had them each water their gardens. So far we've planted onions, garlic, peas, asparagus (planted an additional 50 plants last year), carrots, and lettuce. I have starts going in the greenhouse for peppers, tomatoes, onions, eggplant, and cukes. Hope it's a good year for the garden!
Saturday, March 21, 2009
Brooding Turkeys
Last year my wife and I took the plunge and ordered some heritage breed turkey poults from Murray McMurray. We lost about half of them during an unexpected cold snap last spring but managed to raise two hens and a tom for the table. The tom was our Thanksgiving Day centerpiece. Delicious! Out of that original order we kept two hens and a tom with the intention of trying to get them to breed. It looks like our chocolate hen is sitting on 5 eggs at the moment. She rarely comes out and hisses like a mother chicken hen when you get too close. We'll see how she does.
Friday, March 13, 2009
More Bee Photos
Photos showing honeybee eggs in worker cells, worker larvae in cells, capped drone larvae, and a queen cell from a newly emerged queen. Notice the 'hinged' flap at the bottom of the cell that's still hanging on. In the photo showing the eggs in the cells you can also see two drones. These are male bees with their characteristically huge eyes.
Labels:
drone,
eggs in cells,
larva,
queen cell
Beekeeping Photos
Over the years I've taken what I consider to be some decent photos in the bee yard. Every year when I teach the beginners class I wish I had some of those photos to show the students an example of some of the things I'm talking about that aren't part of the presentation. Guess I need to update the presentation for next year. Anyway enjoy the photos.
Check out the nice mouse nest I found in a hive that died over the winter. This is what awaits you if you don't get your mouse guards on in time.
The frame covered with bees shows the nice 'pie crust color' of healthy capped worker brood.
Getting Started
The beekeeping year has started. I'm well along into teaching this year's beginning beekeeper class at the Virginia State Arboretum. Today I spent about 6 hours total scraping very old comb off of very old frames and melting the wax down over a wood fire in the front yard. I also cut down all of my old deep boxes into mediums which left me with a bunch of very useful 'shims' that are very handy to have. I think the wood fire method is a loser when it comes to melting comb. It's hard to beat the solar wax melter for getting really nice-looking purified wax. Unfortunately solar melters don't work too well when it's snowing outside.
While our main sideline, hobby, money-losing business is beekeeping we also dabble with turkeys, chickens, gardening, our orchard, and a myriad of other projects. More on those later. I'll see if I can find a photo of our very fine looking Tom turkey who spends his waking hours wooing the hens. He's quite a sight strutting his stuff.
Subscribe to:
Posts (Atom)